Our herb spiral was a long time in the making. It just kept getting shoved down the list of things to do. But the herb seedlings were languishing in their pots, so I put my foot down and we did it in two days.
We decided to build the wall with bricks from top to bottom (1) because we have so many clay bricks left from our old patio. (2) We’re also planning to build the base of our earth oven with these bricks, so there will be a visual continuity in our backyard. And (3) we like neither the look, nor the instability, of just placing a ring of stones around and on top of a mound of soil.
So our spiral involved a lot of lugging of bricks and of a surprising amount of soil, but all in all it only took about 12 man-hours to complete it. And it was good fun: what a great shape to work with!
- Build it
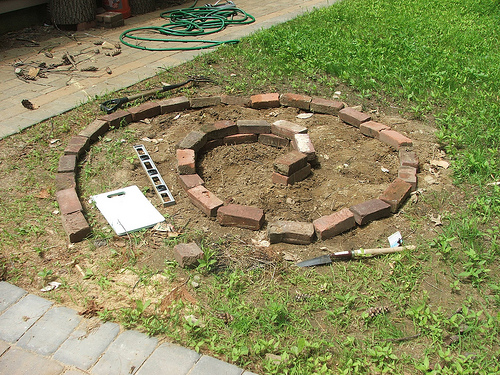
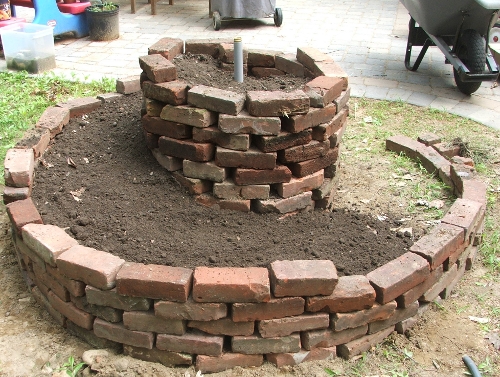
First you lay out the spiral on the ground with one layer of bricks. The spiral can go in either direction, but I guess clockwise with the sun makes most sense (even though ours goes counterclockwise). Count on the inner column reaching at least 3 feet high. You can make it as high as 4 feet, then the slope will be steeper. But keep in mind that the plants will also grow, some over a foot tall.
Make the whole thing not more than 5 feet wide, so you can easily reach the center without having to lean or step anywhere on the spiral. Walk around it to make sure that you can reach all parts for easy harvesting. Bear in mind plantings around the spiral, and plot stepping stones or narrow paths.
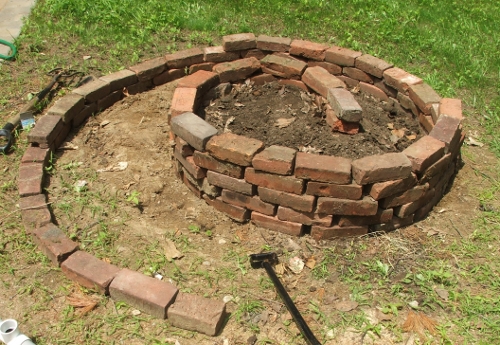
Then start building up the inner column. There’s no need to cement, but make sure the individual bricks don’t wobble. Also, don’t pay attention to the grade yet, just concentrate on the inner column.
When you’ve reached about 2 feet, fill it up with soil. Don’t put your best soil at the bottom. We used the small soil pebbles that we sifted out of our loam for the garden beds: great way to get rid of some junk. Some advise putting gravel or stones at the bottom for better drainage, but we figured this would create a barrier between the “bed” and the land with its nutrients and beneficial soil organisms.
- Learn from our mistakes
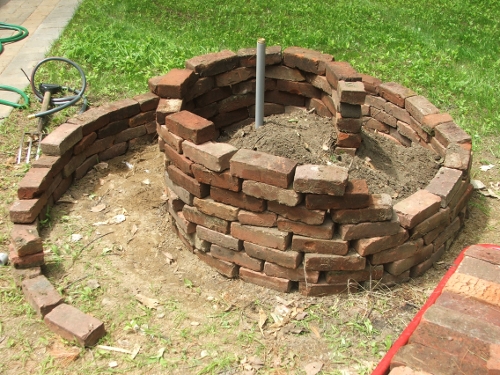
Then curse, because you realize you’ve forgotten to put in the sprinkler (if you’re using one). Break the wall open and dig out the soil where you want the sprinkler system to go. Select from your large store of pvc pipes two pieces about 4 feet long for the horizontal part and one a little over however high you make your spiral for the vertical part, and any broken elbow connector from the trash. Through this assembly thread a short piece of hose (the box stores sell cheap “remnants” 15 feet long). Make sure to get the ends (connectors) right. Bury the system in the soil underneath the spiral.
Put the whole thing back together again and forgive your oversight: it is the cost of your enthusiasm. And that you put the hose in the wrong way, blame that on the hot sun beating down on your brain and the sweat pouring into your eyes. And in any case, they have adapters for that.
As you fill the inner column with soil, fill in the outer path as well, so the brick wall is pressed by the soil on both sides. Carefully tamp down the soil on both sides at the same time, adding to the stability. Once the first layer is done, add the last foot to the inner column.
Now grade the slope by adding bricks to the wall and filling the winding path with soil. Use a hammer to gently tap the bricks here and there, moving them if they’re sticking out to much or have been displaced. This way also try to make the wall lean slightly inwards, for better stability.
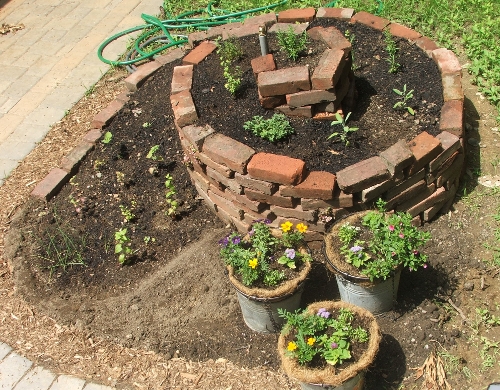
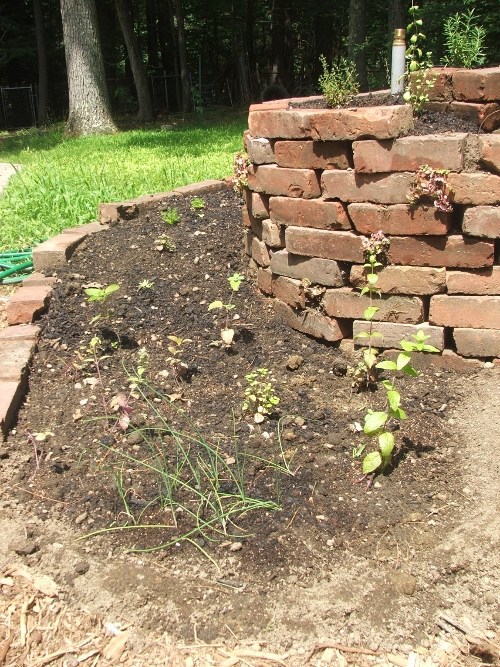
As you can see, a lot of the column will be visible when you’re done. So be sure that you like the look of your building materials. By the time the plantings have reached maturity, it should be lush with green, but some of the bricks will still be visible.
- Zone it
The whole point of the spiral is to create a variety of microclimates out of many combinations of wet/dry, cool/warm, sun/shade. This allows for a greater variety of herbs to be planted together, each in their favorite niche. The most important microclimate zones on the spiral are:
(1) The top, where the water begins but where it won’t hang around for very long. It is also always in full sun. So this is the driest part of the spiral.
(2) The slope, where the water runs, can also be dry, but you can adjust the level of water retention by creating small cups and trenches around you plants so the water can pool. The side of the spiral that is facing North will get the most shade once the plants have grown. (In the beginning, when it’s just seedlings, or seeds, there’s isn’t much shade on a 3 foot high spiral.)
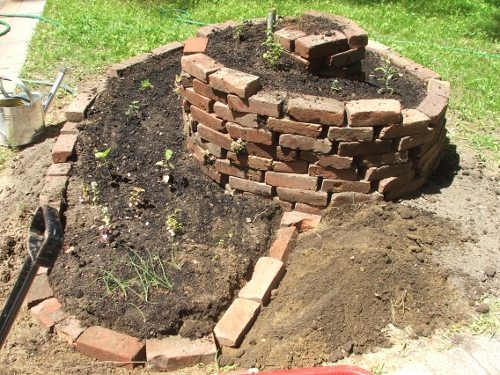
(3) The base, Part I. I divided the base into two parts. Part I is the end of the sloping path, where the runoff water will collect. Thus it is the wettest part. I augmented this aspect by creating a barrier that will keep the moisture in. I buried some bricks right under the surface of the soil.
Then I covered them up so the visual of the spiral isn’t ruined. I also created a low retaining wall all around that area.
(4) The base, Part II. The part of the base against the clay brick wall is a real hot spot, at the moment. It faces South in our case, and the bricks soak up the sun, warming the soil behind them and radiating heat onto the soil in front of them.
(5) The gaps and cracks between the bricks.
- Plant it
Now, to match the plants to the zones. Planting the herbs on the spiral first, top to bottom gives you a good idea of how reachable they will be come harvest time, so place your stepping stones strategically. So down the spiral they go:
The drought/heat/sun-loving herbs are: rosemary, thyme, then oregano, sage, , marjoram. You’re already well down the slope. Add chamomile, parsley, cilantro, etc.
In zone (3) put chives, and all the mints (contain the entire bottom area if you’re afraid they’ll take over your spiral). If it gets really wet down there (depends on the soil, the steepness of the slope and the orientation) you can put watercress.
In zone (4), I will put heat-loving basil – which IMHO would be out of place on the spiral because it is an annual and will yearly leave a gap, and because it can grow too tall.
In (5) the cracks, I put pennyroyal, which is a small mint that is not too invasive. It likes it wet, so I’m not sure if this is the best place for them. So far they’re doing pretty well. We’ll see.
I can’t judge the plantings yet, as they’re all still seedlings. I’ll update as I learn more from my observations as the plants settle in and grow.
- Conclusion
To me, a herb spiral is the emblem of permaculture design.
(1) It allows more plantings in the same space by cleverly stretching the surface into the third dimension.
(2) It allows for a greater variety of herbs to planted together, each in their favorite niche.
(3) It conserves water: runoff is used over and over again as it goes down the path.
(4) It is aesthetically pleasing, a marvel to the eye, and a story piece too.
If you have a partner who needs convincing that this is a serious undertaking, I recommend you slip this schematic into their email. The herb spiral was originally conceived by Bill Mollison and was most recently popularized by Toby Hemenway, in his Gaia’s Garden.

Oh, this is really lovely! I just got the Hemenway book and am devouring it…it’s wonderful to see a spiral in real life (so to speak) as the idea in the book is so compelling.
Oh I just LOVE this! Thank you for sharing. We live at a residential school – our yard is not ours to alter. I imagine, though, we can dig up a bit of earth for this! Thank you, thank you!