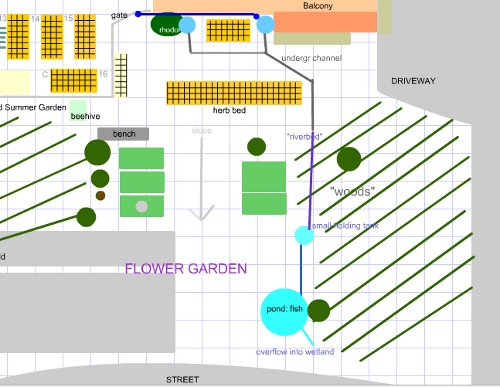
Part of our plans for the front garden – the flower garden – is a pond system at the bottom of the hill that will catch the runoff from the hill and from our roof. The pond will be a wildlife pond, its overflow a wetland. The pond will not be for watering our garden – for that we’d need a pump, and we’d like to keep this as simple and non-automated as we can. We want it for wildlife, for the bees – honey bees need a source of standing water to process the honey – for (edible) fish and for relaxation.
But I’ll write more about the pond and wetland later. Here I am concerned with the “top part” of the system: the connection between our roof and the system.
We want to catch water on top of the hill because (1) that’s where our veg garden is and (2) that’s where our house is, and we take the water from those barrels to flush our toilet – the latter is still a simple bucket system but we’re looking for a way to hook the barrels to the toilet cistern (again, later). For that reason we bought four big rain barrels last year, and we might purchase a couple more as our Town now offers a good deal.
We could put 3 barrels up front, connected to 2 downspouts that take water from the biggest part of the roof, and 2 in the back, where one gutter takes an equal amount. The front part gets more barrels because they can service (by bucket) both the veg garden and (by gravity) the herb beds and the flower garden downhill – consult this (not recent) map.
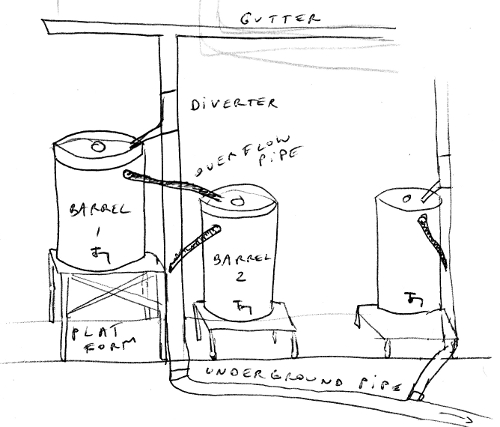
We’ll put simple diverters on each downspout to get the water into the first barrel, which will be on a high platform. We want the simple kind of diverter because we found a cheaper solution to overflow. Once that barrel are full, its overflow pipes will guide the water to the next barrel in line (positioned on a lower platform for access to the tap). Once the last barrel on the line is full, its overflow pipe will guide the excess back into the gutter.
Here’s another sample of my atrocious (or just plain rusty) drawing skills:
In the back of the house, the overflow will disappear into the dry well which will feed it to the groundwater and so on to the aquifer that is under our neighborhood.
In the front we will connect the downspouts to underground pvc pipes that will “surface” on the rim of our hill. Where the underground pipe surfaces, in a patch we call the “woods”, we want to create some sort of brook bed that will take the water to the flower garden pond. We’re thinking we might saw a pipe in half, bury the halves and fill them with stones and pebbles, and plantings. But, about that part, later.
First lets get the downspout/underground system in place, so my herb bed plantings and the reseeding of the grass on the slope won’t be washed away by the rains that are sure to come (back). That’s our plan for this weekend!


Very interesting. Looks like a good plan and I’ll be interested in how you get on with it. I doubt our rain catchment will happen this year, though we are becoming familiar with rainwater flow and the land. Even so, I should at least stick a barrel or two under some of our downspouts!
Great idea. Where can you buy (or craft) a nice, classy looking rain barrel? I’m all for using one that doesn’t look like a recycled pickle barrel. We are on a very public street in a very historic town, so I cannot have a grungy-looking, beat up plastic can.
We like our barrels to be fully visible, as a statement, but we don’t live in a historic neighborhood.
In your case a web search will get you some classy rain barrels but they can get costly. They paint them in all kinds of colors now, you could choose something the color of your siding, or of the plants around it, and hide it that way. Or you could get any barrel and paint it yourself. Or plant tall plants around it. I’ve seen clear ones with gold fish in them: a sure attraction!